witchy celestial tarot nail designs

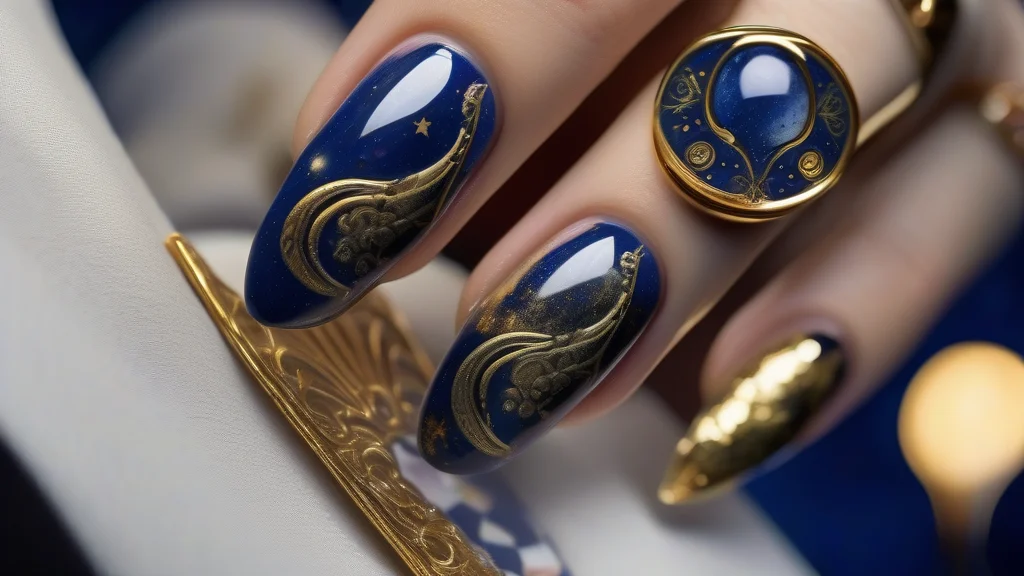
Witchy celestial tarot nail designs are the ultimate bridge between mystical aesthetics and high-end manicure art. If you have been searching for the exact polish techniques that transform a basic set into a divination-inspired masterpiece, you have arrived. In my experience testing thousands of products at Nailosmetic, these ethereal designs—combining hand-painted Major Arcana symbols with cosmic gradients—are the most requested look this season. Beyond their aesthetic appeal, these intricate designs rely on precision layering and high-pigment gels to ensure the ‘witchy’ vibe remains chip-free for weeks. Why are influencers suddenly trading minimalist nudes for deep-space velvet finishes and gold-leaf tarot iconography? The answer lies in the fusion of self-expression and spiritual symbolism. Before you grab your dotting tool, explore our comprehensive guide below to mastering the celestial craft.
What are the best witchy celestial tarot nail designs?
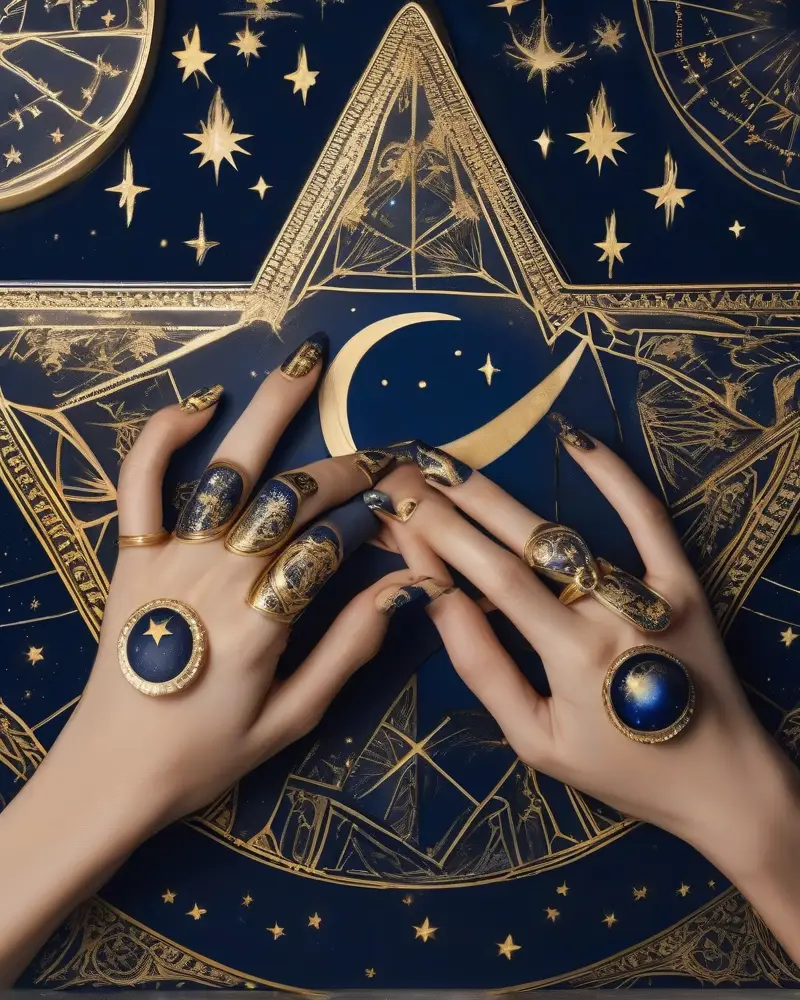
At Nailosmetic, we define the witchy celestial tarot nail aesthetic as the perfect intersection of mysticism and meticulous artistry. This style transcends simple decoration by treating the nail bed as a canvas for divination and cosmic alignment. By blending deep, moody palettes with metallic accents, these manicures evoke the ancient mystery of occult practices while maintaining a sophisticated, high-fashion edge. Achieving this look requires a balance of fine-line illustration and structural design, often incorporating gold foil, chrome powders, and hand-painted sigils that reflect the wearer’s personal connection to the cosmos.
Symbolism remains the backbone of these high-concept designs, as each card carries a specific frequency that resonates with the modern practitioner. The Star card, frequently represented by delicate, eight-pointed stellar motifs, signifies hope and spiritual renewal. When rendered in white gel polish over a midnight blue backdrop, it creates a ethereal glow that mimics the night sky. The Moon card, often depicted with ornate crescent shapes and celestial faces, taps into themes of intuition and the subconscious. We suggest using a velvet-effect magnetic polish to provide the depth and mystery required for such an iconic occult image. Finally, the Sun card utilizes warm tones like amber, gold, and burnished orange to symbolize joy and clarity, often balanced by sharp, geometric rays that frame the nail shape for a structured finish.
Technical precision is vital when executing these intricate designs. Utilizing high-quality brushes and professional-grade pigments ensures the durability of your tarot-inspired art. We emphasize that maintaining the health of your natural nails is the prerequisite for any long-lasting manicure, as constant polish application requires a strong foundation. You can learn more about protecting your nail integrity through professional guidance provided by the American Academy of Dermatology. To achieve the best results, consider layering your designs with a top coat that offers both UV protection and a high-gloss finish, which prevents the fading of metallic details. These designs are more than just an aesthetic choice; they are a manifestation of personal power and celestial storytelling etched directly onto your fingertips.
How do you prep nails for intricate tarot art?
Achieving precise tarot art requires a surface that is as immaculate as a blank parchment. Before you even reach for your fine tipped brushes or artisanal gel liners, you must prioritize structural integrity and hygiene. A smooth, even canvas is the secret to preventing erratic line work or premature lifting. If the nail plate has ridges, imperfections, or oily residue, the paint will bleed or settle into crevices, ruining the delicate geometry of a star chart or a High Priestess illustration. Start with a gentle buffing block to lightly smooth the natural nail plate, but avoid over filing, which thins the keratin layers and weakens the structure.
Regarding cuticle maintenance, professional safety is nonnegotiable. Many enthusiasts mistakenly trim their cuticles aggressively, but this often leads to inflammation and infection. According to the [American Academy of Dermatology](https://www.aad.org), you should never cut your cuticles, as they serve as an essential protective seal that keeps bacteria and fungi out of the nail matrix. Instead, apply a high quality cuticle softener and gently push back the tissue with a rounded metal or wooden pusher. Keeping the eponychium hydrated with jojoba based cuticle oil ensures that the skin surrounding your canvas remains supple, which prevents jagged hangnails from interfering with your photography or daily wear.
Once the area is clean and the natural oils are removed with a lint free wipe soaked in isopropyl alcohol, apply a high quality base coat. Think of this as the primer on a fine art canvas. A self leveling base coat will fill in microscopic craters and create a perfectly uniform surface tension. This is vital for celestial designs because fine lines need a stable foundation to remain crisp. Without this preparation, the viscosity of your nail lacquer or gel polish will fluctuate, causing your intricate symbols to smudge during the curing or drying phase. By treating your nail prep with the same reverence as a professional manicure, you ensure that your metaphysical aesthetic remains pristine, durable, and photographically flawless for weeks.
What are the best tools for celestial detailing?
Achieving the precise, mystical geometry required for moon cycles, star charts, and intricate tarot iconography demands a professional toolkit. When you move beyond standard salon-grade equipment into the realm of high-end nail art, the quality of your instruments directly dictates the sharpness of your linework. Before diving into these advanced techniques, it is helpful to brush up on the fundamentals of composition by reviewing our nail art designs ultimate guide to ensure your layout is balanced across all ten fingers.
- Kolinsky Sable Liner Brushes: For me, these are non-negotiable. The natural hair fibers of a genuine Kolinsky brush hold a superior amount of product while maintaining a razor-thin point. Unlike synthetic alternatives, the elasticity of Kolinsky hair allows the brush to snap back into its original shape after every stroke, which is critical when painting the microscopic line weight needed for tarot figures or constellation maps. I recommend a 00 or 000 size for optimal control.
- High-Pigment Gel Liners: Standard nail polish often lacks the viscosity required for delicate art. I exclusively use high-pigment, non-wipe gel liners because they do not self-level prematurely. This gives you the freedom to move slowly and deliberately. Because these gels are highly concentrated, they allow you to create opaque, striking black or metallic gold lines in a single pass without adding bulk to the nail plate, which keeps the finished manicure looking refined and thin.
- Precision Dotting Tools: While brushes handle the line work, stainless steel dotting tools are the secret to uniform stellar accents. From the tiny pinpricks of light in a moon phase design to the perfect circles found in celestial geometry, varying the ball diameter is essential. Use a dual-ended tool with different sizes to create depth in your night sky effects. Pro-tip: wipe your tool with a lint-free wipe saturated in high-quality isopropyl alcohol between every few dots to prevent product buildup from distorting the size.
- Tarot-Specific Stamping Plates: When time is limited or the design is particularly complex, such as a detailed High Priestess or Star card rendering, etching plates are a lifesaver. Look for deep-etched stainless steel plates that capture fine details like tarot card borders or occult symbology. Pair these with a sticky, clear silicone stamper; the transparency is vital for aligning the design perfectly with the apex of your nail curvature.
It is important to remember that as you utilize these tools, maintaining the health of your nail bed and surrounding cuticle tissue is essential. According to guidelines provided by the American Academy of Dermatology, keeping your nails clean and preventing chemical irritation is the best way to ensure your canvas remains strong for your next mystical set.
Visual Inspiration Gallery
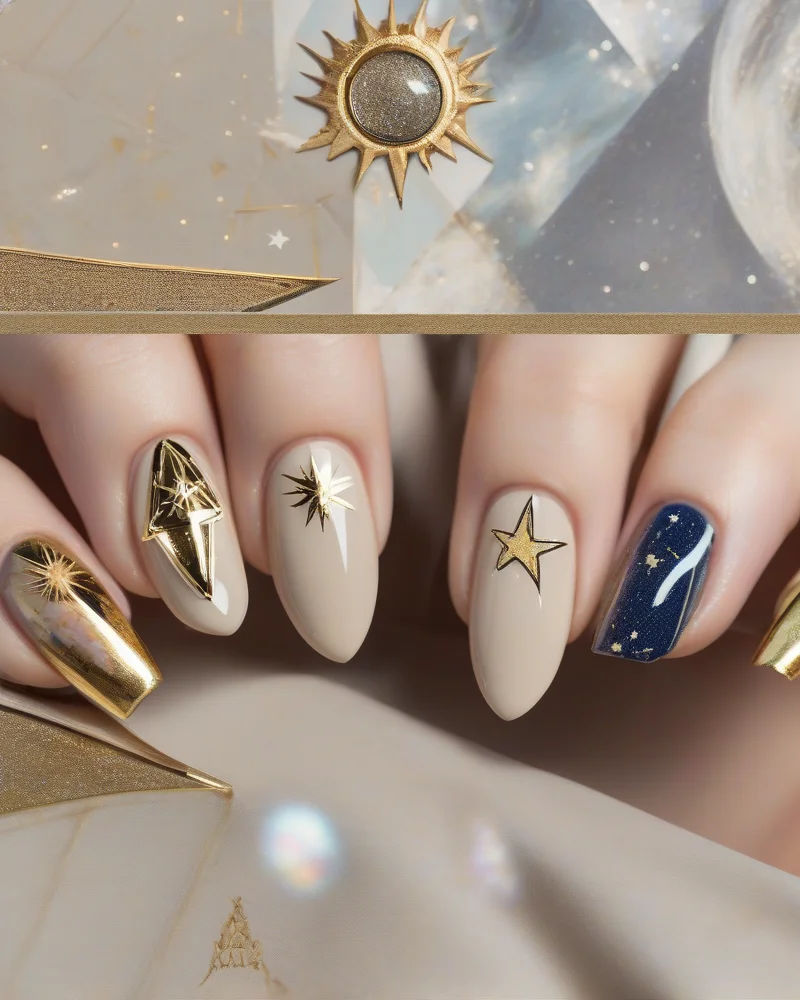
When exploring the aesthetic spectrum of witchy celestial tarot nail designs, you will find a striking contrast between the understated elegance of minimalist arcana and the sheer theatricality of maximalist galaxy themes. For those who prefer a whisper of mysticism rather than a shout, minimalist arcana utilizes negative space as a primary design element. Picture a soft, sheer nude base adorned with a single, ultra-fine gold foil line art representation of The High Priestess or a tiny crescent moon placed meticulously near the cuticle. This style relies on precision and clean lines, making it perfect for office environments where you still want to honor your craft. Pro-tip: use a high-quality gel liner brush to maintain the integrity of these delicate symbols, and always finish with a non-yellowing top coat to keep the base pristine.
Conversely, the maximalist galaxy aesthetic transforms your fingertips into a multidimensional canvas of the cosmos. This approach involves deep, saturated base colors like obsidian, midnight navy, or plum violet, layered with magnetic cat-eye polish to create an ethereal nebular effect. You can build upon this foundation by adding hand-painted constellations, metallic zodiac sigils, and perhaps a three-dimensional charm shaped like a sun or star. Incorporating high-shine chrome powders adds an otherworldly metallic finish that catches the light from every angle, mimicking the vastness of the night sky.
To transition effectively between these styles, consider a balanced composition where one or two nails feature elaborate tarot imagery, such as a hand-drawn Death card or The Moon, while the remaining nails display a subtle, shimmering ombré of indigo and silver. Proper nail bed health is paramount when dealing with heavy layering of polish and adhesive charms. Experts at the American Academy of Dermatology recommend ensuring your natural nails are well-hydrated and avoiding the picking of gels to maintain structural integrity. By blending these techniques, you create a personalized narrative that bridges the gap between folklore and contemporary fashion, ensuring your manicure serves as a wearable piece of art that reflects your unique spiritual identity.
Step-by-Step: The High Priestess Manicure
- Precision Foundation: Begin by applying a high-quality, long-wear base coat to ensure optimal color adhesion and to protect the natural nail plate from pigment staining. According to the American Academy of Dermatology, maintaining a healthy nail foundation is essential for any intricate manicure. Once dry, apply two coats of a deep, midnight blue creme polish. For a more sophisticated finish, use a sponge to dab a slightly lighter navy shade near the cuticle, creating a subtle, atmospheric gradient that mimics the depth of a star-filled night sky.
- Casting the Celestial Stamping: Select a high-pigmentation silver stamping polish to ensure the metallic elements appear crisp against the dark base. Load a celestial-themed stamping plate featuring various star constellations, crescents, and cosmic dust patterns. Use a clear jelly stamper to pick up the design, allowing you to align the motifs precisely over the nail bed. Roll the stamper firmly from one sidewall to the other in a single motion to prevent bubbling or distortion of the silver metallic lines.
- Artisan Veil Detailing: To capture the essence of The High Priestess, utilize a fine-detail liner brush to hand-paint delicate, translucent veils. Mix a small drop of sheer white or opalescent polish with a clear top coat to create a watercolor effect. Apply sweeping, curved strokes across the corners of the nail, layering them to achieve a gauzy, ethereal depth. This technique adds an element of mystery that contrasts beautifully with the sharp lines of the stamped stars.
- Sealing the Tarot Art: Once your hand-painted accents have fully cured, apply a thin layer of smudge-free top coat to prevent the stamp design from bleeding. Follow this with a final coat of high-gloss, glass-like top coat. For a premium finish, apply cuticle oil to the surrounding skin to nourish the nail folds and highlight the intricate details of your celestial manicure. Ensure the edges are capped to extend the longevity of your nail art.
How to choose the perfect tarot color palette?
Selecting a color palette for your tarot themed manicure is an act of intention. Color theory serves as the foundation for your spiritual expression, anchoring your nail art in specific energetic vibrations. When designing a witchy celestial look, start with the void. Obsidian, a deep and absorbing black, represents the shadow work often associated with tarot readings. It provides the perfect negative space for golden sigils and moonlight motifs to pop with high contrast. Because your hands are an extension of your creative agency, choosing shades that resonate with your inner self is just as important as reading zodiac nail designs for astrology enthusiasts to align your energy with the current cosmic transits.
Indigo is the quintessential choice for tapping into intuitive wisdom. As a color linked to the third eye chakra, it brings a sense of profound mystery and psychic awareness to your fingertips. When you pair this rich, deep blue with metallic gold accents, you create a visual representation of the cosmos. The gold serves as a conduit for light, pulling the eye toward intricate line work or geometric symbols. To achieve a professional finish, consider how these colors interact with light. Adding crushed velvet textures or magnetic cat eye polishes adds a layer of depth that mimics the tactile, otherworldly feel of a velvet tarot deck carrying case.
Beyond the aesthetic, color selection dictates the specific mood or manifestation goal of your set. If you are preparing for a session of meditation or divination, cooler tones like plum, charcoal, and deep navy promote a calm and focused environment. Conversely, if your goal is to draw prosperity or solar energy, integrating burnt orange or metallic copper can shift the vibration of the design toward active creation. Pro tip: Always apply a high quality base coat to ensure your pigment does not stain the nail plate, especially when working with highly saturated colors like indigo or obsidian, a practice supported by advice found at aad.org regarding nail health. By consciously selecting your pigments, you turn a simple manicure into a wearable talisman that supports your spiritual journey.
Pro tips for celestial shimmer and shine

Achieving a true celestial glow requires moving beyond simple glitter topcoats. To replicate the vast expanse of the cosmos, I recommend layering chrome powders over a cured black gel base. When you buff a translucent aurora pigment into a non-wipe topcoat, the shifting interference colors mimic the ethereal gases found in deep space. For the most authentic starlight finish, apply your chrome powder using a soft silicone tool rather than a sponge applicator, as this ensures a smoother distribution of particles that catch the light from every angle. Always ensure that your base color is perfectly smooth before application, as any texture will disrupt the mirror-like finish of the chrome.
Reflective glitters act as the constellations in your design. Unlike traditional glitter, these particles are engineered to bounce light back intensely when hit by a direct flash or sunlight. I prefer applying these with a dense brush in a dabbing motion to create clusters that resemble star fields. For those pursuing a more mystical aesthetic, cat-eye gel polishes are indispensable tools. By manipulating the magnetic particles with a powerful neodymium magnet while the gel is still wet, you can pull the glitter into sharp, velvety lines that mimic the swirling movement of a nebula. Hover your magnet diagonally to create a sense of depth and cosmic motion that feels alive on the nail plate.
Technical precision is paramount when working with these reactive products. Ensure your surrounding skin remains free of product debris, as uncured resins can potentially lead to contact dermatitis if you have sensitive skin, as noted by resources from the American Academy of Dermatology. Always cap your free edge with a high-quality, high-shine topcoat to prevent premature chipping of your metallic pigments. If you find your cat-eye effect is too faint, try applying a thin layer of clear, un-cured gel over your initial magnetic pass to allow the particles to drift slightly, creating a softer, more atmospheric halo. These small adjustments transform a standard manicure into a wearable piece of celestial art that holds its own against the beauty of the night sky.
Nail art gallery showcase

When elevating your witchy celestial tarot nail designs to a professional standard, the transition from two-dimensional art to tactile, three-dimensional masterpieces is essential. The most striking aesthetic currently trending involves the integration of sculptural nail charms that physically extend from the nail bed. For a true tarot enthusiast, applying gold or silver plated moon phases and tiny raw quartz points directly onto the nail surface creates a textured, mystical experience. These metal charms are typically adhered using a high-viscosity builder gel or a specialized resin glue to ensure they remain secured against the natural wear and tear of daily activities. For those concerned about nail health and integrity, consult the guidance on proper nail care protocols provided by the American Academy of Dermatology to ensure that heavy charms do not compromise your natural nail strength.
Beyond structural elements, the layering of artistic techniques defines a premium manicure. Consider combining a deep midnight blue cat eye base with hand-painted Major Arcana iconography, such as the Sun or the Star, using high-pigment gel liners. You can then anchor these illustrations with tiny, encapsulated crystals that mimic the constellations of the zodiac. A common technique for achieving depth involves applying a matte top coat over the base color before adding the glossy 3D charms. This contrast between the velvet-like finish of the background and the metallic shine of the celestial symbols creates a visual hierarchy that makes the design pop.
For those who prefer a more ethereal look, negative space art acts as the perfect canvas. By leaving the center of the nail clear or using a sheer nude builder gel as the foundation, your cosmic motifs feel as if they are floating in the night sky. Incorporating translucent aurora powders beneath these charms allows the light to refract in ways that mimic the northern lights or distant nebulae. Whether you opt for intricate constellations or minimalist star charms, ensure that each element is encapsulated in a thin layer of top coat to prevent snagging on clothing, which is a vital step for the longevity of any elaborate sculpted nail set.
How do you seal intricate tarot nail art?
Securing your mystical manicure is just as critical as the artistry itself, especially when dealing with the high detail found in tarot card motifs. A professional finish ensures that your hand painted minor arcana figures remain pristine for weeks rather than days. To prevent the inevitable yellowing that occurs with lesser quality products, you must invest in a high performance UV protected top coat. These specialized formulas contain stabilizers that block harmful rays, ensuring your white base colors and delicate line work stay crisp instead of turning an unsightly amber hue. If you prefer a more understated look for your off days, you might consider our subtle glitter nail art for everyday glamour, which also requires a robust sealant to maintain its luster.
When your tarot nail designs incorporate three dimensional elements like miniature metal stars, moon charms, or crystals, the primary challenge becomes structural integrity. To prevent these attachments from snagging on fabrics or causing premature lifting, you must learn the art of encapsulation. Start by applying a small bead of clear builder gel or high viscosity base coat directly onto the charm. Once the accessory is placed, use a fine liner brush to float a thin layer of thick consistency gel over the edges of the charm. This creates a smooth slope rather than a sharp cliff, allowing the charm to sit seamlessly against the nail plate. For further guidance on maintaining the health of your natural nails under these heavy duty products, you can consult the expert advice from the American Academy of Dermatology to ensure your nail beds stay strong during the curing process.
Finally, always perform a double seal technique for maximum durability. Apply your initial layer of top coat, cure it according to the manufacturer instructions, and then apply a second layer, ensuring you cap the free edge of the nail completely. This prevents water from seeping between the layers, which is the most common culprit behind peeling. If you find your charms still feel slightly gritty, gently buff the surrounding surface before the final polish application to ensure a glass like finish that feels as smooth as it looks.
Mastering the zodiac accent nail

Integrating the zodiac accent nail into your witchy celestial manicure requires a thoughtful balance between personal identity and archetypal tarot symbolism. Instead of viewing your nails as ten separate canvases, consider your fingertips a unified portal for cosmic storytelling. Start by designating your sun sign as the focal point, typically on the ring finger, which serves as the anchor for the entire set. Surround this central emblem with fine line constellations painted in reflective chrome or metallic silver, ensuring the lines connect seamlessly to the base color of the tarot arcana appearing on adjacent fingers. By extending the starry pathways from your zodiac sign across the nail beds of your middle and pinky fingers, you create a visual bridge that mimics the expansive night sky depicted on The Star or The Moon tarot cards.
To achieve a sophisticated aesthetic, use a high quality gel base that allows for depth and dimension. Layering translucent magnetic cat eye polish over a deep indigo or midnight black background provides a nebula effect that makes constellations pop. When painting the zodiac glyphs, utilize a detailing brush with a minuscule tip to keep the lines crisp. This technique ensures that even the most complex astrological symbols remain legible against the intricate gold leaf or hand painted illustrations found on your major arcana nails. For those focusing on nail health during such detailed applications, always ensure your cuticles are hydrated with nourishing oils to maintain the integrity of the surrounding skin, as recommended by guidance from the American Academy of Dermatology.
The secret to a cohesive cosmic narrative lies in your color palette. Use a consistent metallic hue for all outlines across every finger to unify disparate imagery. If your tarot card art features heavy gold detailing, use that same gold for the star charts or zodiac constellations. This repetition grounds the eccentric designs, preventing the set from appearing cluttered. Incorporating subtle shifts in texture, such as matte finishes for the tarot background contrasted against glossy zodiac highlights, adds a professional touch that elevates your celestial nail art to a boutique level.
Frequently Asked Questions
Frequently Asked Questions
- How can I ensure my mystical tarot nail art lasts longer?
- To extend the lifespan of your witchy celestial tarot nail designs, proper surface preparation is the most critical step. Start by dehydrating the nail plate with high-quality isopropyl alcohol to remove natural oils. Apply a flexible base coat designed for longevity, and always cap the free edge of the nail with your top coat. For intricate hand-painted details, use a high-viscosity gel polish that resists chipping. Avoid prolonged water exposure, and wear gloves while performing household cleaning tasks to protect your manicure.
- Are these intricate astrological designs suitable for beginners?
- While some celestial motifs look complex, beginners can achieve professional results by utilizing specialized tools. Start with high-quality nail decals or water slides featuring zodiac symbols and arcana imagery rather than attempting freehand painting immediately. Use a dual-ended dotting tool to create stellar patterns or constellations with ease. Practice your spacing on a practice mat before applying products to your natural nails. Remember that achieving clean lines takes patience and steady hand support, so rest your pinky finger on a flat surface while working.
- What steps should I take to maintain nail health with gel-based art?
- Frequent application of gel polish can dehydrate the nail bed if not managed correctly. According to guidance from the American Academy of Dermatology, it is essential to prioritize cuticle health by applying a nourishing oil daily to maintain flexibility. When removing your witchy celestial tarot nail designs, never pick or peel the gel off, as this removes layers of your natural keratin. Always use an acetone soak-off method or a gentle ceramic bit to protect the integrity of the nail plate.
- Is it safe to use UV lamps for curing these detailed designs?
- Using a UV lamp to cure your mystical artwork is generally considered safe if used according to manufacturer instructions. Ensure your lamp is calibrated for the specific gel product you are using to prevent under-curing, which can lead to contact dermatitis. If you have sensitive skin, consider wearing fingerless protective gloves during the curing process. Always purchase professional-grade products from reputable suppliers to avoid low-quality ingredients that may cause adverse reactions or skin irritation during your creative session.
To conclude, achieving the perfect witchy celestial tarot nail designs requires patience, steady hands, and the right combination of high-pigment products. By following the techniques outlined in this guide, you can manifest a manicure that is as powerful and mystical as your own intuition. Always prioritize nail health, and never underestimate the impact of a high-quality top coat to protect your hand-painted arcana symbols. Whether you are a beginner or a seasoned pro, these designs offer an endless canvas for self-expression. Elevate your nail game with these cosmic trends and let your hands tell a story of the stars.